前言 2017 年大概 11 月份时在 PyCon China 2017 杭州站分享了 Python 跨平台兼容性实践,讲述了如何让 Python 程序兼容更多的平台。
遗憾的是,当时没有影像资料,又缺少文字记录。现在应朋友的要求,将当时的内容整理成文字。
本文将首先介绍背景,然后介绍如何做到解释器的兼容性,再介绍库的兼容性,最后介绍如何进行多个平台的持续集成,从而达到跨平台兼容性的目的。
背景 为什么要做跨平台兼容性?
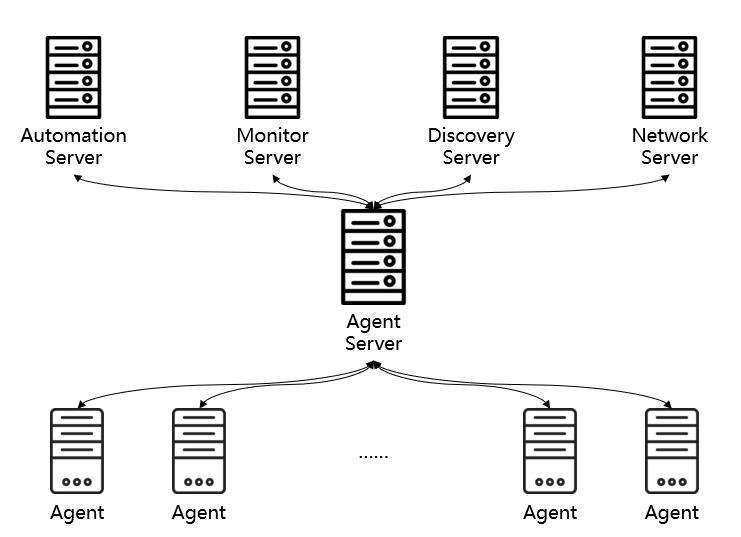
我们的产品部署架构如下:
每一台目标机上需要安装一台 Agent,Agent Server 对这些 Agent 进行管理。而由于目标机众多(成千上万台),其操作系统也可能千差万别。我们需要支持不同的操作系统大类(如 Windows、Linux、AIX 等)、不同的发行版(如 CentOS、Debian 等)、不同的版本(如 CentOS 5、6、7)。而 Agent 是由 Python 编写的,这就对 Python 程序的兼容性提出了很高的要求。
若要做好兼容性,我们需要考虑如下内容:
解释器兼容性。由于 Agent 自带 Python 解释器,首先需要让 Python 解释器支持目标平台。
库兼容性。每个库都有其特定的平台要求,需要改造所依赖的库以支持目标平台。
多平台持续集成。不同平台构建出的 Agent 程序包是不同的,如何进行有效的构建管理是需要思考的问题。
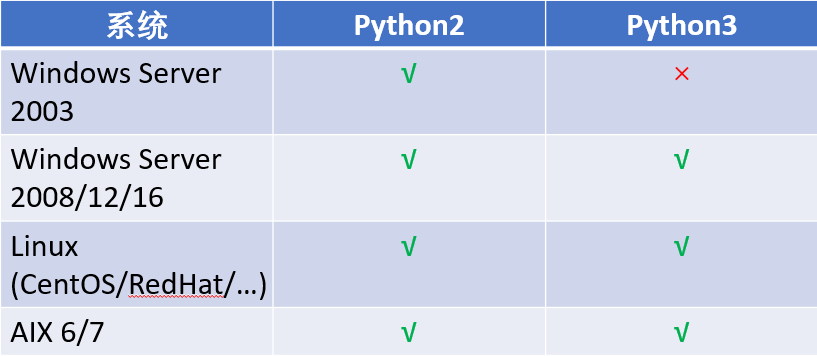
解释器兼容性 Python 2 还是 3? 摆在我们眼前的第一个问题就是到底是用 Python 2 还是 3?究竟哪个解释器对跨平台的支持力度更好呢?
我们对它们所支持的操作系统做了一个简单的对比,发现 Python 3 相对于 Python 2 来说少了对 Windows 2003 的支持。
对我们所依赖的 Python 库做了对比,发现当时的两个核心依赖库对 Python 3 支持的都不好。
所以,在这个问题上,我们投 Python 2 一票。
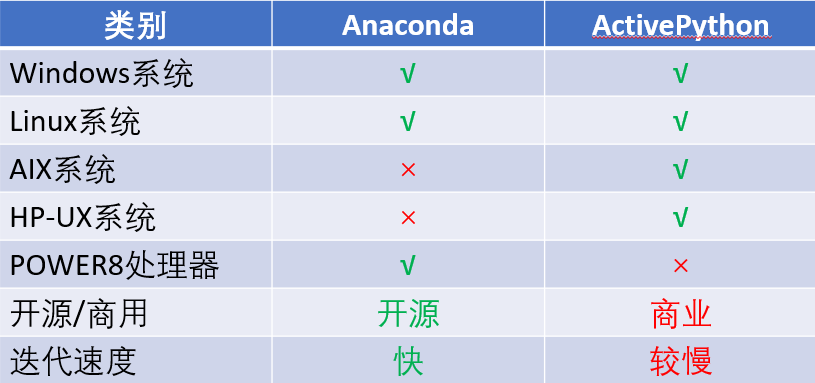
现成的解释器兼容方案 如果市面上有现成的解释器兼容方案,那么我们就拿来主义即可,不用自己再去折腾。市面上主流的有两个 Python 集成环境:Anaconda 和 ActivePython,我们做了一个对比:
Anaconda 的优势在于支持运行于 Power 8 处理器的常见操作系统,迭代速度快、开源;而 ActivePython 的优势在于支持 AIX 和 HP-UX 系统。考虑到没钱,我们选择 Anaconda 作为 Windows 和 Linux 平台的基础解释器环境。
当然了,Anaconda 在少数几个平台上会遇到各种无法运行的问题。
在 SUSE 10.0 上
1
2
linux:~/python-linux-64 # ./bin/python Floating point exception
在 AIX 6.1 上
1
2
IBM-P520: ~/python-linux-64# ./bin/python -bash: ./bin/python: cannot execute binary file: Exec format error
针对于上述情况,我们在特定平台上需要定制的解释器。
特定平台兼容性方案 所谓的特定平台兼容性方案,其实就是编译,分为两个步骤:
编译必要的 Python 依赖库,如:
sqlite 轻量级数据库
zlib 数据压缩库
readline 交互式文本编辑库
openssl TSL 和 SSL 密码库
编译 Python 2
不同平台上的编译方法略有差异。
在 Linux 上编译 sqlite/zlib/readline
1
2
linux:~ # CFLAGS=-fPIC ./configure --prefix=/opt/python-suse64/ linux:~ # make && make install
openssl
1
2
linux:~ # CFLAGS=-fPIC ./config shared --prefix=/opt/python-suse64/ linux:~ # make && make install
Python 2
1
2
linux:~ # LDFLAGS="-Wl,-rpath=\$\$ORIGIN/../lib" ./configure --prefix=/opt/python-suse64 linux:~ # make && make install
简单验证
1 2 3 4 5 6 7 8 9 linux:~/python-suse10-64 Python 2.7 .13 (default, Jul 7 2017 , 04 :15 :22 ) [GCC 4.0 .2 20050901 (prerelease) (SUSE Linux)] on linux2 Type "help" , "copyright" , "credits" or "license" for more information. >>> import platform, hashlib, zlib, sqlite3>>> platform.architecture()('64bit' , 'ELF' ) >>> hashlib.sha1().hexdigest()'da39a3ee5e6b4b0d3255bfef95601890afd80709'
在 AIX 上编译 确保安装了 bash、gcc 等必要工具。AIX 是 Unix 平台的一个发行版,我们是要使用和 Linux 上一样的编译方法吗?不如照着上面的方法执行一遍。
简单验证
1 2 3 4 5 6 7 8 9 10 11 IBM-P520:/opt/python-aix-64 Python 2.7 .13 (default, Apr 20 2017 , 22 :45 :10 ) [GCC 4.8 .4 ] on aix6 Type "help" , "copyright" , "credits" or "license" for more information. >>> import platform>>> platform.architecture()('32bit' , '' ) >>> quit()IBM-P520:/opt/python-aix-64 64
查看上述结果我们发现,AIX 明明是 64 位的,结果却显示 32 位。这是因为 Python 解释器本身是 32 位。那就是说直接套用上一节中的方法还不能编译出系统自身位数的 Python 解释器,还需加以改造。
通过以下方法,我们显式地编译 64 位版本的 Python 解释器。
sqlite
1
2
3
IBM-P520:/opt# CC="gcc -maix64" ARFLAGS="-X64 cr" ./configure --prefix=/opt/python-aix64/ # 修改 libtool 中 AR_FLAGS="cru" 为 AR_FLAGS="-X64 cru" IBM-P520:/opt# OBJECT_MODE=64 make && make install
zlib/readline
1
2
IBM-P520:/opt# CFLAGS="-maix64" ARFLAGS="-X64 cr" ./configure --prefix=/opt/python-aix64/ IBM-P520:/opt# OBJECT_MODE=64 make && make install
openssl
1
2
IBM-P520:/opt# ./Configure threads --prefix=/opt/python-aix64 aix64-gcc IBM-P520:/opt# make && make install
Python 2
1
2
IBM-P520:/opt# ./configure --prefix=/opt/python-aix64 --with-gcc="gcc -maix64" CXX="g++ -maix64" AR="ar -X64" CFLAGS=-fPIC IBM-P520:/opt# make && make install
编译好后,在验证时可能遇到这样的问题:
1
2
3
4
5
6
7
8
9
>>> import zlibTraceback (most recent call last): File "<stdin>" , line 1 , in <module> ImportError: Could not load module /opt/python-aix-64 /lib/python2.7 /lib-dynload/zlib.so. Dependent module /opt/freeware/lib/gcc/powerpc-ibm-aix6.1 .0 .0 /6.3 .0 /../../../libz.so could not be loaded. Could not load module /opt/freeware/lib/gcc/powerpc-ibm-aix6.1 .0 .0 /6.3 .0 /../../../libz.so. System error: Exec format error Could not load module /opt/python-aix-64 /lib/python2.7 /lib-dynload/zlib.so. Dependent module /opt/python-aix-64 /lib/python2.7 /lib-dynload/zlib.so could not be loaded.
这是因为当你把编译好的文件夹移动到其他目录后,解释器无法找到动态链接库(编译的时候写死了路径),所以在运行时需要指定 lib 路径:
1 LD_LIBRARY_PATH=/opt/python-aix-64/lib ./bin/python
pip 编译完 Python 后,我们还需要安装 pip,用来后续安装各种 Python 库。不过在 AIX 上安装 pip 库时,你可能会遇到这样的问题:
1
2
3
Modules/ld_so_aix gcc -maix64 -pthread -bI:Modules/python.exp build/temp.aix-6.1-2.7/psutil/_psutil_aix.o build/temp.aix-6.1-2.7/psutil/arch/aix/net_connections.o -lperfstat -o build/lib.aix-6.1-2.7/psutil/_psutil_aix.so unable to execute 'Modules/ld_so_aix': No such file or directory error: command 'Modules/ld_so_aix' failed with exit status 1
从报错可以看出,是找不到 Modules/ld_so_aix,那么我们就对症下药,显式地指明这个路径。修改 ./lib/python2.7/_sysconfigdata.py 的构建相关参数:
1 2 3 4 5 6 7 8 build_time_vars = { ... 'BLDSHARED' : 'Modules/ld_so_aix gcc -maix64 -pthread -bI:Modules/python.exp' , ... 'LDSHARED' : 'Modules/ld_so_aix gcc -maix64 -pthread -bI:Modules/python.exp' , ... }
将 Modules 修改为 ./lib/python2.7/config 的绝对路径。
在完成的 Python 的编译和 pip 的安装后,我们就要考虑库的兼容性了。
库兼容性 考虑到 Agent 主要的作用是采集和控制,那么主要就需要考虑如下几个方面的兼容性:
平台参数,如操作系统、发行版、版本号等
进程、系统管理功能,如查看进程、网络等
文件管理功能,如高级拷贝、重命名、删除
进程守护功能,如以服务形式来守护进程
以上类别我们都依赖了特定的库,包括标准库和第三方库。我们需要考察所依赖库的兼容性,并对其不兼容的地方加以改造。
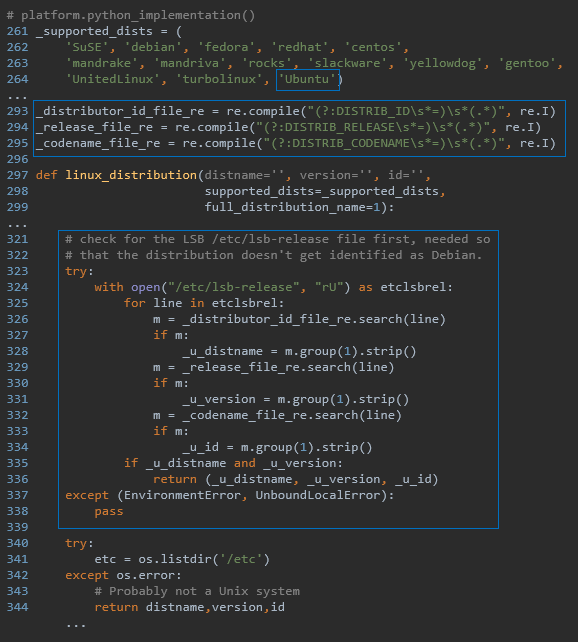
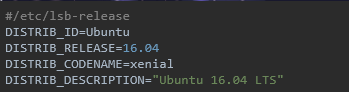
我们使用 Python 标准库 platform 来检测 Agent 所运行的平台。platform 库在 Ubuntu 发行版上的存在识别出错的问题。
编译的 Python
1
2
3
>>> import platform>>> platform.platform()'Linux-4.4.0-62-generic-x86_64-with-debian-stretch-sid'
系统自带的 Python
1
2
3
>>> import platform>>> platform.platform()'Linux-4.4.0-62-generic-x86_64-with-Ubuntu-16.04-xenial'
这背后是因为 Ubuntu 系统自带的 Python 对 platform 标准库进行了改造。查看其源码,我们可以发现多了如下内容的改造:platform.py
/etc/lsb-release
思考 对平台库来说,我们关注如下几点:
系统大类,如 Windows、Linux、UNIX 等
发行版,如 CentOS
发行版本号,如 2003(Win)、7.2.1511(CentOS)
内核版本号,如 10.0.14393(Win)、3.10.0(Linux)
而 platform 标准库存在一些不足:
在不同平台上,完成相同的目的需要调用不同的函数,而结果往往又很难直接使用。
Windows
1
2
3
4
5
6
7
8
9
>>> import platform>>> platform.win32_ver()>>> ('10' , '10.0.14393' , '' , u'Multiprocessor Free' )>>> platform.dist()('' , '' , '' ) >>> platform.uname()('Windows' , 'Prodesire' , '10' , '10.0.14393' , 'AMD64' , 'Intel64 Family 6 Model 94 Stepping 3, GenuineIntel' ) >>> platform.platform()'Windows-10-10.0.14393'
Linux(SUSE)
1
2
3
4
5
6
7
8
9
>>> import platform>>> platform.linux_distribution()('SUSE LINUX ' , '10.0' , 'X86-64' ) >>> platform.dist()('SuSE' , '10.0' , 'X86-64' ) >>> platform.uname()('Linux' , 'linux' , '2.6.13-15-default' , '#1 Tue Sep 13 14:56:15 UTC 2005' , 'x86_64' , 'x86_64' ) >>> platform.platform()'Linux-2.6.13-15-default-x86_64-with-SuSE-10.0-X86-64'
AIX
1
2
3
4
5
6
7
8
9
>>> import platform>>> platform.linux_distribution()('' , '' , '' ) >>> platform.dist()('' , '' , '' ) >>> platform.uname()('AIX' , 'IBM-P520' , '1' , '6' , '00C59DEF4C00' , 'powerpc' ) >>> platform.platform()'AIX-1-00C59DEF4C00-powerpc-64bit'
平台扩展库 pf 针对 platform 的不足,以及我们的需求,可以设计一个基于 platform 的扩展库 pf。其提供 get_platform 函数用来获取平台,并返回 Platform 命名元组,包含系统大类、发行版
1
2
3
4
5
6
7
8
9
10
11
12
13
14
15
16
17
18
19
20
21
22
23
24
25
26
27
28
29
30
31
32
33
34
35
36
37
38
39
40
Platform = namedtuple('Platform' , ['system' , 'dist' , 'version' , 'cpu' , 'kernel' ]) def get_platform () : global _platform if _platform is not None : return _platform version = kernel = '' uname = platform.uname() system = uname[0 ] arch = rstrip(platform.architecture()[0 ], 'bit' ) cpu = 32 if arch == '32' else 64 if system == 'Windows' : dist = 'Windows' kernel = uname[3 ] result = re.findall('(\d+)' , uname[2 ]) if result: version = result[0 ] elif system == 'Linux' : platform_str = platform.platform().strip().lower() result = re.findall( 'with-(centos|ubuntu|debian|fedora|redhat|oracle)-' , platform_str) if result: dist = LINUX_DIST_MAP[result[0 ]] … else : … version = platform.linux_distribution()[1 ] kernel = platform_str.split('-' )[1 ] if not dist and 'amzn' in platform_str: … return Platform(system, dist, version, cpu, kernel)
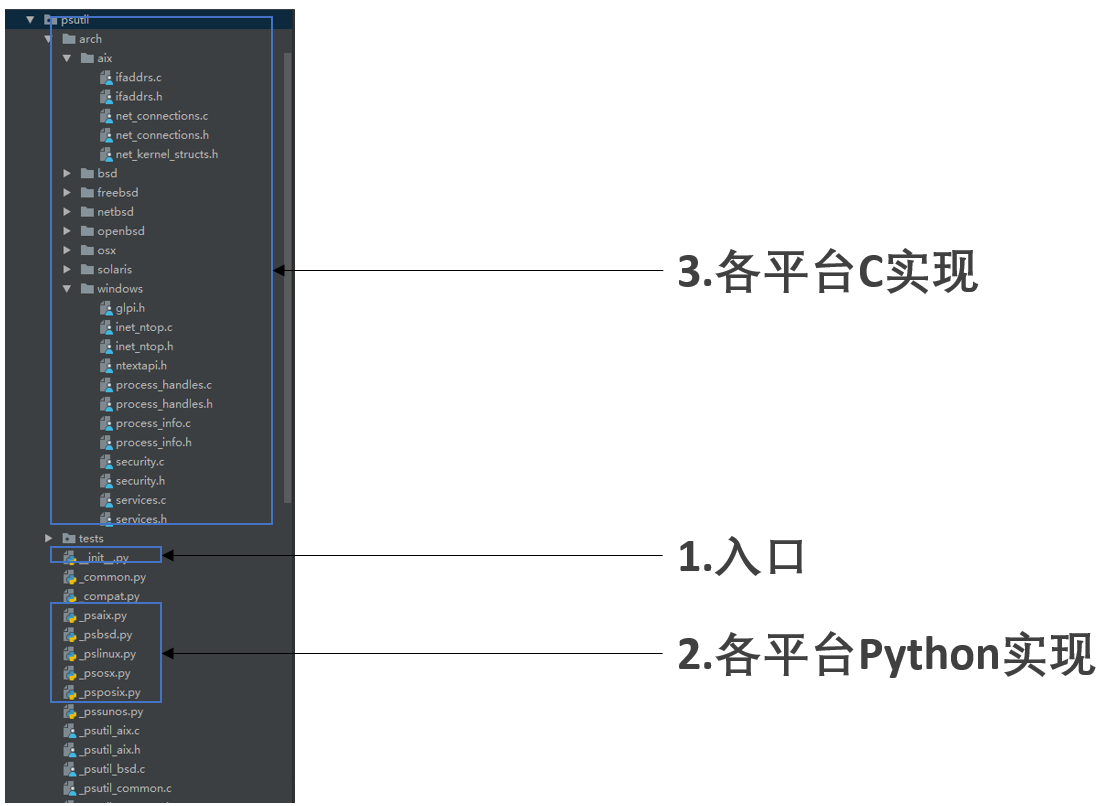
进程、系统管理库 psutil 介绍 psutil(process and system utilities) 是一个跨平台的库,用于检索 Python 中运行的进程和系统利用率(CPU,内存,磁盘,网络,传感器)的信息。
不足
不对老版 Windows(如 2003)进行维护。(3.4.2 及更早版本支持)
不支持 AIX (最新版 5.4.0 支持,但在低版本的 AIX6 上报错)
在 CentOS/RedHat 5.0 上安装报错
获取常用指标(如 IP、硬盘大小、是否为虚拟机等)不够便捷
优化 由于 psutil 是我们所依赖的核心库之一,改善其不足点非常必要,这甚至需要从源码层面来解决。
这就要了解其项目结构:
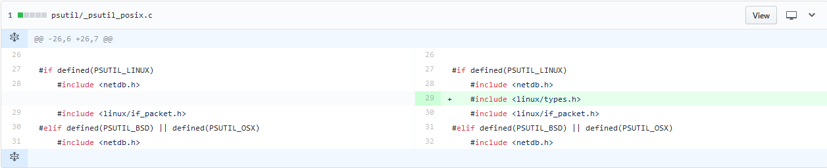
让我们以 psutil 在 CentOS 5.0 上安装报错为例来讲解如何进行优化。
报错
1
2
3
4
gcc -pthread -fno-strict-aliasing -g -O2 -DNDEBUG -g -fwrapv -O3 -Wall -Wstrict-prototypes -fPIC -DPSUTIL_POSIX=1 -DPSUTIL_VERSION=530 -DPSUTIL_LINUX=1 -DPSUTIL_ETHTOOL_MISSING_TYPES=1 -I/home/project/python-linux64/include/python2.7 -c psutil/_psutil_posix.c -o build/temp.linux-x86_64-2.7/psutil/_psutil_posix.o In file included from psutil/_psutil_posix.c:27: /usr/include/linux/if_packet.h:52: error: expected specifier-qualifier-list before '__u32' error: command 'gcc' failed with exit status 1
错误原因 Red Hat Bugzilla – Bug 233934 The patch “xen: Add PACKET_AUXDATA cmsg” cause /usr/include/linux/if_packet.h broken 。
系统 Patch Red Hat Bugzilla – Attachment #150888: Include linux/types.h for __u32. for bug #233934 :
为 psutil 打 Patch Fix #1138: error on CentOS 5.0: expected specifier-qualifier-list before ‘__u32’ 。
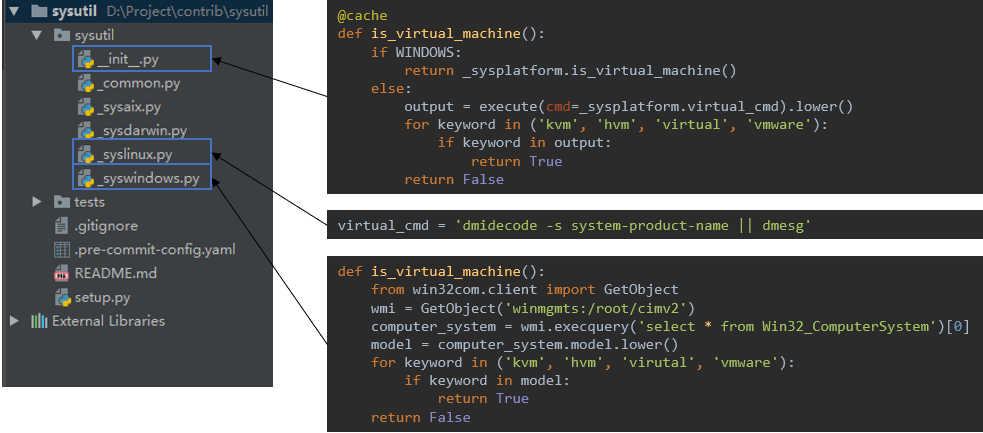
进程、系统管理扩展库 sysutil 前文我们提到 psutil 在获取常用指标上还不够便捷,为此我们需要开发扩展库 sysutil。
介绍 sysutil 是一个跨平台的库,基于 psutil,用于获取 IP、磁盘、是否为虚拟机等信息。
使用 1 2 3 4 5 6 7 8 9 10 11 12 13 14 15 16 17 >>> import sysutil>>> from pprint import pprint>>> >>> pprint(sysutil.network_info())[snetworkinfo(name='docker0' , mac='02:42:c5:0f:df:9c' , ipv4='172.17.0.1' , ipv6='fe80::42:c5ff:fe0f:df9c' , netmask='255.255.0.0' ), snetworkinfo(name='eno16777984' , mac='00:50:56:ab:e9:f6' , ipv4='10.1.100.100' , ipv6='fe80::250:56ff:feab:e9f6' , netmask='255.255.255.0' )] >>> >>> pprint(sysutil.disk_info())[sdiskpart(device='/dev/mapper/centos-root' , mountpoint='/' , total=53660876800 ), sdiskpart(device='/dev/mapper/centos-home' , mountpoint='/home' , total=424532996096 ), sdiskpart(device='/dev/sda1' , mountpoint='/boot' , total=520794112 )] >>> >>> sysutil.cpu_info()scpuinfo(brand='Intel(R) Core(TM) i5-6500 CPU @ 3.20GHz' , frequency='3.2000 GHz' , family=6 , vendor_id='GenuineIntel' , stepping=3 , cache_size='6144 KB' , model=94 ) >>> >>> sysutil.is_virtual_machine()True
实现 以 sysutil 中 is_virtual_machine 函数为例,我们讲解下 sysutil 是如何实现判断当前平台是否是虚拟机。
一个功能函数在多个平台上可能有相同的实现,也可能有不同的实现。我们把入口函数放在 __init__.py 中,相同的实现放在 _common.py 中,不同的实现放在 _sys 开头的系统特定实现文件中。
Windows 和 Linux/Unix 截然不同的判断方式,因此在入口函数处判断是否是 Windows 平台,然后调用特定方法。而 Linux/Unix 平台上不同的发型版所执行的判断命令可能不同,因此其系统特定实现文件中仅仅写上不同的命令即可。
文件管理库 nfs 介绍 nfs 是一个跨平台的自研库,基于 shutil、tarfile、zipfile 等系统库,用于提供更高层次的文件管理功能。
功能函数 1 2 3 4 5 6 remove(src, filter_files=None , filter_dirs=None , exclude_files=None , exclude_dirs=None ) copy(src, dst, filter_files=None , filter_dirs=None , exclude_files=None , exclude_dirs=None , symlinks=False , mode=0750 ) touch(path) rename() compress(src, dst='.' , name=None , root=None , postfix='.tar.gz' ) uncompress(src, dst='.' , temp_dir=None , overwrite=True , extract_all=False )
实现 以 remove 为例,在删除文件时我们可能并不在意要删除的是文件还是文件夹,以及我们想要忽略一些特定的文件(夹),标准库 shutil 并不能直接满足我们的需求。此外,在 Windows 平台上删除文件时可能会报无法删除的错误,也需要在发生错误时做一定处理。
1 2 3 4 5 6 7 8 9 10 11 12 13 14 15 16 17 18 19 20 21 22 23 24 25 26 27 28 29 30 31 32 33 34 35 def remove (src, filter_files=None, filter_dirs=None, exclude_files=None, exclude_dirs=None) : if glob.has_magic(src): for new_src in glob.glob(src): remove(new_src, filter_files, filter_dirs, exclude_files, exclude_dirs) return if not isdir(src): filepaths = _get_filenames([src], filter_files, exclude_files) if filepaths: _remove_file(filepaths[0 ]) return for root, dirnames, filenames in walk(src, filter_files, filter_dirs, exclude_files, exclude_dirs): for filename in filenames: _remove_file(join(root, filename)) for dirname in dirnames: path = join(root, dirname) shutil.rmtree(path, onerror=onerror) if not os.listdir(src): shutil.rmtree(src, onerror=onerror) def onerror (func, path, exc_info) : import stat if not os.access(path, os.W_OK): os.chmod(path, stat.S_IWUSR) func(path) else : raise
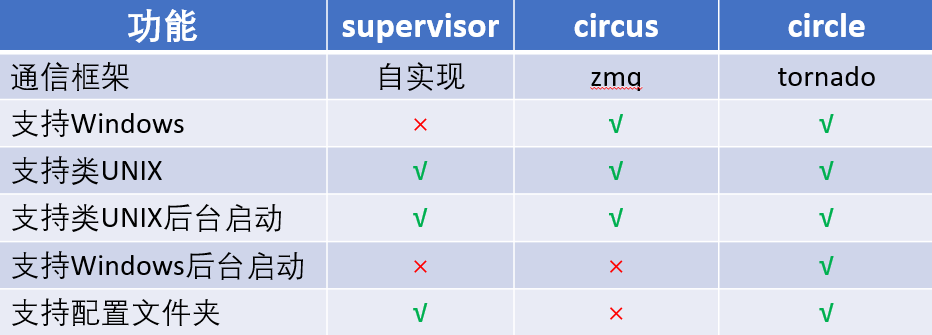
进程守护库 circle 介绍 circle 是一个跨平台的自研库,基于 circus ,用于提供进程守护功能。
对比 我们都知道著名的进程守护库 supervisor,很遗憾的是它不支持 Windows。circus 虽然支持 Windows,但是少了支持配置文件夹、Windows 后台启动的功能。于是,我们就需要基于 circus 做一定的改造。
使用 配置
1 2 3 4 5 6 7 [watcher:framework] cmd=$(CIRCLE.ENV.ANT_PYTHON) -m framework numprocess=1 stop_children=True [env:framework] ANT_MODULE_ROOT=$ANT_ROOT_DIR
运行
1 2 3 4 Linux/Unix: ./bin/circled -c circled.ini --daemon Windows: .\python .\bin\circled -c circled.ini --daemon
实现 以后台服务为例bin/circled
1 2 3 4 5 6 7 8 9 10 11 12 13 14 "exec" "./embedded/bin/python" "./bin/circled" "$@" if __name__ == '__main__' : import sys from os.path import dirname, abspath root_dir = dirname(dirname(abspath(__file__))) sys.path.insert(0 , root_dir) from circle.circled import handle_cli handle_cli()
circle/circled.py
1 2 3 4 5 6 7 8 9 10 11 12 def handle_cli () : cli_args = parse_args() main(cli_args) def main (args) : if args['--daemon' ]: if IS_WINDOWS: win_daemonize() else : unix_daemonize() ...
circle/circled.py
1 2 3 4 5 6 7 8 9 10 11 12 13 14 15 16 17 18 19 20 21 22 23 24 25 26 27 28 29 30 31 32 33 34 35 36 def win_daemonize () : logger.info('Starting deamon mode. The AntCircled service will be started.' ) args = sys.argv[1 :] if '--daemon' in args: args.remove('--daemon' ) try : if not CircleWinService.exists(): CircleWinService.install(*args) CircleWinService.start(*args) else : CircleWinService.start(*args) sys.exit(0 ) except (AlreadyExist, NotExistError, CallError) as e: logger.error(e) sys.exit(1 ) class CircleWinService (object) : ... @classmethod def install (cls, *args) : logger.info('Installing ant-agent service' ) if not os.path.exists(CIRCLED_PATH): raise CallError('{} not exists.' .format(CIRCLED_PATH)) returncode, output = _nssm_run('install' , cls.name, BIN_START) if returncode == 0 and 'Administrator access' in output: raise CallError(output) elif returncode == 5 : raise AlreadyExist(cls.exist_msg) elif returncode != 0 : raise CallError(output) logger.info('ant-agent installed' )
多平台持续集成 在完成了解释器和库的兼容性后,我们需要考虑如何根据不同的平台构建出来。
配置化构建 Python 程序的构建其实就是对文件的操作:移动、复制、git clone、压缩等等。在不同平台上这些操作所对应的命令也不尽相同,那么是否可以做到配置化部署呢?一份配置能够在多个平台上被解析运行。这样就大大减少了我们的维护成本了。
配置化构建,就需要考虑配置是命令式的,还是声明式的。
命令式——怎样做到应该做的
声明式——应该做到什么
其实并不存在一边倒的选择,我们应该考虑其:
我们希望具备足够的灵活性,并能了解到构建的步骤,所以采用了命令式的配置。在一个名为 build.yml 的文件中写成如下形式:
1 2 3 4 5 6 7 8 9 10 11 12 13 14 15 windows-64: steps: - makedirs {t} - copy {s}/bin {t} exclude .* - support_plat {{'Windows':[64]}} {t}/manifest.yaml - add_date {t}/manifest.yaml - rename {t}/proc/win_openresty.ini.disable {t}/proc/openresty.ini.disable - remove {t}/bin/*.sh - pip_install python-windows-64 {t}/requirements/production.txt - copy python-windows-64 {t} - rename {t}/python-windows-64 {t}/embedded - git clone git@git.gitlab.com:ant/openresty.git {s}/openresty - copy {s}/openresty/openresty_win32/ {t}/openresty - compress {t} {project_name}-windows-64-{project_version}.zip - remove {t}
在 build.yml 中:
最外层的 windows-64 是一个标签,构建命令通过这个标签找到具体的构建步骤。如果整个构建是针对所有平台,这里可以命名为 all。否则,则可以命名为具体的平台。
steps 则是构建步骤,每个步骤开头都是一个命令,这些命令在全平台是通用的。
{}代表构建程序内置变量,比如{t}代表目标路径,{s}代表源路径
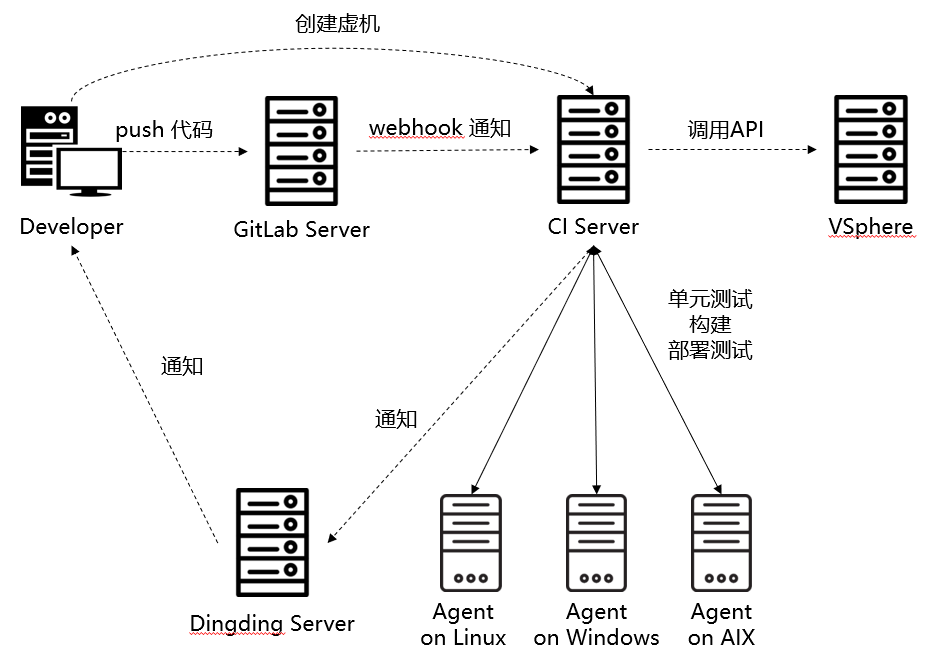
持续集成流程 每个环节都搞定后,我们还要把整个流程串起来。以下是大致的流程:
开发 push 代码到 GitLab 服务器
GitLab 通过 WebHook 通知 CI 服务器
CI 服务器通知各平台上的 Agent 进行单元测试、构建和部署测试
Agent 在每个任务执行好后将结果通知给 CI 服务器
CI 服务器将消息发送给 Dingding 服务器
开发人员收到消息后进行下一步操作
另一个环节是开发人员可能需要虚拟机用来测试,那么就会在我们的 CI 服务器上申请创建虚拟机,CI 服务器通过调用 VSphere 接口进行创建。